Import reference data
In Movebank, reference data refers to information describing animals, tags and deployments. This information can be critical to properly understand and use data, for example by providing the sex or life stage of the animals, detailing technical specifications of the tags, or defining different study sites. You can import reference data before or after adding your event data. If you have many data files or complicated deployments, you may want to add the reference data prior to importing your event data.
You can also add and edit reference data within Movebank using the Deployment Manager.
We recommend checking the data after upload to ensure quality control. If you receive an error during import and are unsure of the cause, see here for solutions to some common formatting issues. Contact support@movebank.org for further assistance.
To begin, prepare the reference data in a delimited tabular format, such as .csv or tab-delimited text files. Here is a template reference data file you are welcome to use. When preparing the file, make sure that
- values such as timestamps are formatted consistently throughout the file, and
- there are no empty rows.
When your file is ready,
- Go to the Studies page and log in to Movebank.
- Importing a reference data file can overwrite reference data already in the study. We recommend that you download a copy of the current reference data to avoid losing information in case of unexpected results.
- From the Studies menu on the Studies page, select Upload > Import Data > Reference data about animals, tracking tags, or deployments.
You can choose whether to upload your reference data in a standard Movebank format or a custom format. Custom data can be uploaded for animals, tags, deployments or a combination of the three. Attributes can include details about the deployments (start and end times, comments), the animals (sex, date of birth) and the tags (model, weight). See the Movebank Attribute Dictionary for a description of reference data terms.
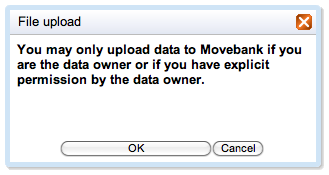
- After selecting an upload option, choose the file to upload and select Upload. You will then be prompted to confirm that you are permitted to upload the data.
The upload interface displays two tables which show the content of your file as Movebank sees it and a preview of how it will be saved in Movebank. Use these tables to ensure that your reference data are interpreted correctly.
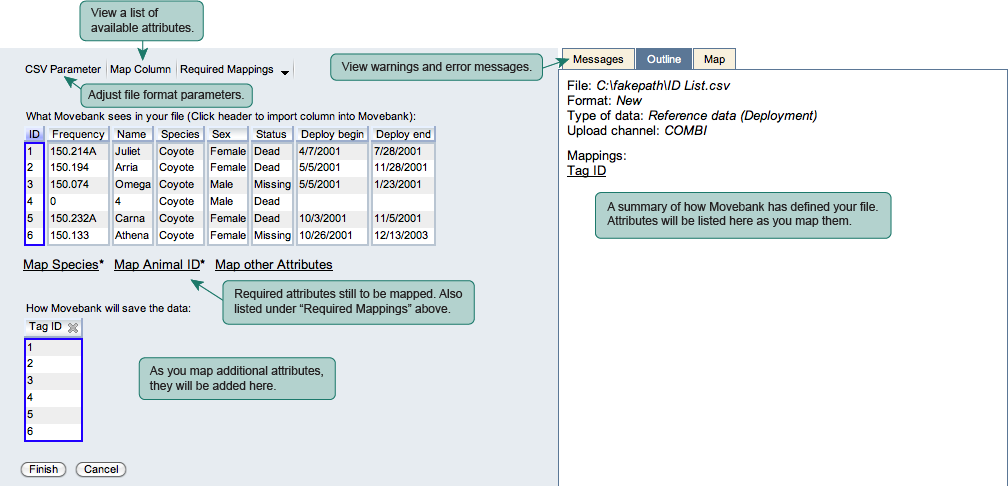
The interface allows you to map each attribute of your reference data file to the Movebank format. Depending on what you have already uploaded to your study, you may be required to map one or more of these before you can import the file.
Animals and tags
Use the Movebank Animal ID and Tag ID attributes to add animals and tags to your study. While these attributes can also be defined while importing event data, it may be easier to upload this information in a reference data file as a separate step, especially if you have many animals and/or tags and will be uploading individual files for each.
To open the import options,
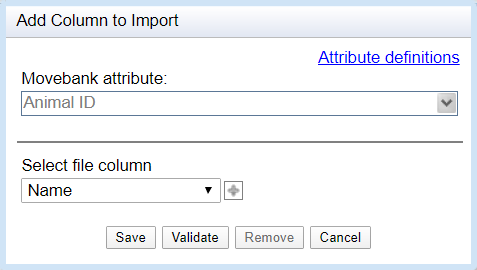
- Select either Tag ID or Animal ID from Map Column or choose them from the list of required mappings.
- Select the column that contains the identifiers in your reference data file from the dropdown list under Select file column. If needed you can concatenate columns by clicking on the
 to add a new column and choosing a field separator from the dropdown list that appears.
 - Click Save.
After you have defined the tags and/or animals in your reference data file, the columns Tag ID and/or Animal ID will be added to the table under How Movebank will save the data showing the identifiers you selected. Compare these to the values in your original file to confirm the attributes were mapped correctly. If you need to edit the mapping, select a column header to re-open the import options.
Species names
The Movebank Species (or Taxon) attribute allows you to map species names to the Movebank format. Movebank requires a scientific species name for each animal, based on the Integrated Taxonomic Information System (ITIS, www.itis.gov). If the species or subspecies name is not available in the ITIS, include the lowest level taxonomic rank that can be determined and that is used in the ITIS taxonomy. Additional information can be provided using the term taxon detail.
You can define the species in your reference data file in one of three ways:
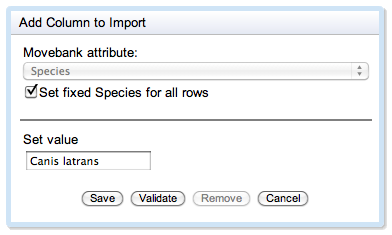
If all animals belong to the same species,
- Check the box next to Set fixed Species for all rows.
- The Set value field will appear. Enter the scientific name for the species or other taxon.
- Click Save.
If the file contains a column with scientific names,
- Select Column contains scientific names.
- Select the name of the column that contains species names from the dropdown list.
- Click Save. If you receive error messages, this is likely because the species names in this column do not match scientific species names based on the taxonomy that Movebank uses (see above). This could be due to misspellings or because you are using a different taxonomy. To import this attribute, you can either change your file or map the names to Movebank-supported scientific names using the File contains a field with common names option.

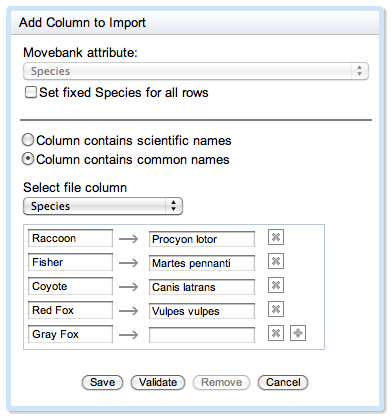
If the file contains a column with common names,
- Select Column contains common names.
- Select the name of the column that contains common names from the dropdown list.
- A list of all values in this column will appear. In the field to the right of each value (e.g., raccoon) enter the scientific name (e.g., Procyon lotor).
- When all scientific names are entered correctly, click Save.
The Taxon ID column will be added to the table under How Movebank will save the data showing the scientific species names. Compare these values to those in your original file to confirm the names were mapped correctly. If you need to edit the mapping, select the Taxon ID column header to re-open the import options.
Deployment start and end times
The deploy on timestamp and deploy off timestamp attributes allow you to define the range of time that a tag was deployed on an animal. This information can be essential to organizing data in Movebank if, for example, you have deployed the same tag on multiple animals, or if data files include information collected before the tag was deployed on an animal. In these cases, deployment begin and end dates are needed to correctly assign data records to animals. Time of day can be provided to define more precise deployment periods—if no time of day is provided, midnight (UTC) is used.
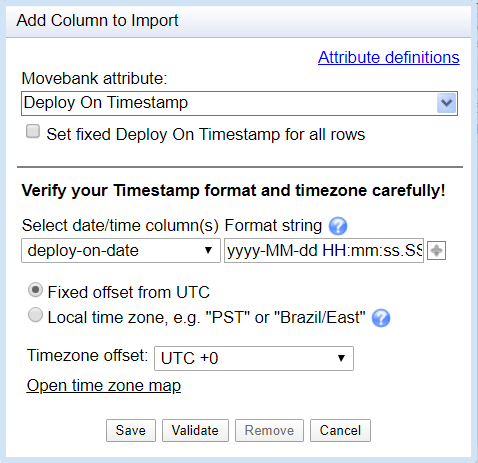
To map these attributes to the Movebank format,
- Click on Map column from the upper left of the upload interface.
- Select Deploy on Timestamp from the dropdown list under Movebank attribute.
- Select the name of one or more columns in your reference data file that contain the deployment start times from the dropdown list under Select date/time column/s.
- Define the timestamp formats and time zones following these instructions.
- When you have entered all the information correctly, hit Save.
- Repeat these steps for the Deploy off Timestamp attribute.
The Deploy on Timestamp and Deploy off Timestamp columns will be added to the table under How Movebank will save the data, showing the date and time in the format yyyy-MM-dd HH:mm:ss.SSS. Compare these timestamps to your original file to confirm the attribute was mapped correctly (remember that Movebank converts all timestamps to UTC). If you need to edit the mapping, select the column headers to re-open the import options.
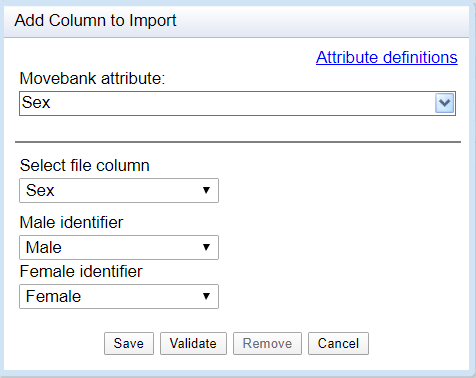
Animal sex
Use the animal sex attribute to define the sex of the animals based on a column in your reference data file.
- Select the column from your file that contains sex information and clarify which values identify female, male and unknown.
- When you are finished, hit Save.
The Sex column will be added to the table under How Movebank will save the data. Compare these values to those in your original file to confirm the attribute was mapped correctly. If you need to edit the mapping, select the column header to re-open the import options.
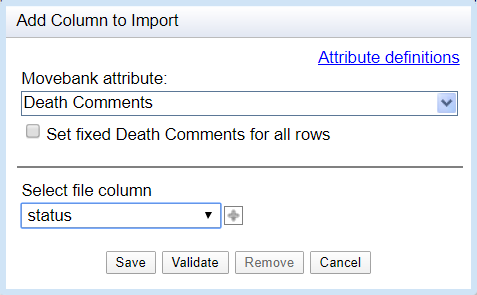
Other reference data attributes
Additional parameters, such as animal life stage or tag manufacturer and model, can also be included in a reference data file. See the Movebank attribute dictionary for a list of attributes accepted by Movebank. This list is not static and will grow over time. If you cannot find a particular attribute in the list, select Request Attribute from the upload interface and fill out the form that appears, or contact us at support@movebank.org.
To import additional attributes from your file,
- select Map Column from the upper left of the upload wizard and choose an attribute from the dropdown list. You can also select a column header from under What Movebank sees in your file and choose the appropriate Movebank attribute.
- When you have selected the correct attributes from Movebank and your file, hit Save.
A new column will be added to the table under How Movebank will save the data showing the new attribute as it will be imported to Movebank. Confirm the attribute was mapped correctly.
Finish the reference data import
After you have specified all the information for your data upload,
- Check once again that all data fields are correctly read by Movebank using the preview table.
- Select Finish. If any necessary information is missing, you will be reminded to make the needed changes. After making any changes, you will have the option of saving your file format. If you have multiple files with the same formatting, save your format so that you can prepare uploads for additional files more quickly.
Create and manage live data feeds
Live feeds from Africa Wildlife Tracking
Import reference data