Importing custom tabular data
If your data file is not in a supported standard format and can't be imported using a live feed, you can use a flexible interface to map each attribute (column) of the data file to a Movebank attribute.
We recommend checking data after import to ensure quality control. If you receive an error during import and are unsure of the cause, see here for solutions to common formatting issues. Contact support@movebank.org for further assistance.
Preparing data files
To begin, prepare your data in a delimited tabular text format, such as .csv or tab-delimited text files. The column names, order and content are very flexible, so long as the formatting is consistent. A header row is recommended but not required. Here is one example:
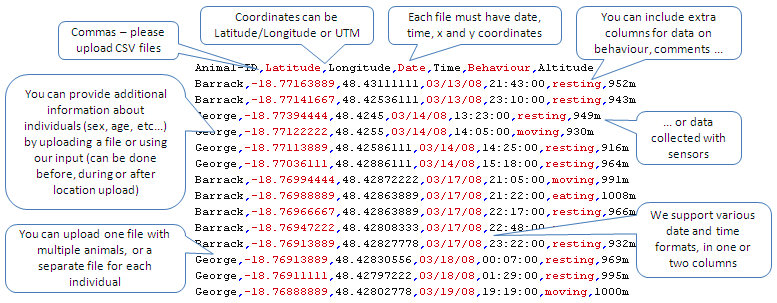
To minimize the chance of errors or mistakes in importing your data, make sure that
- values such as timestamps are formatted in the same way throughout the file;
- all rows contain a timestamp;
- file is delimited by commas or other another supported delimiter;
- the delimiting character is not used within field values unless the value is quoted;
- line breaks in within values are removed or values are quoted;
- there are no non-numerical characters in numeric fields (common culprits are na, N/A, <, >, +);
- there is only one header row;
- there are no empty columns; and
- there are no empty rows.
If you will import a large number of files,
- Consider merging them into fewer files, or at least formatting the files consistently, to reduce time needed to import.
- Use file names that will help you identify what is in each file.
Starting the import
When your file is ready,
- Go to the Studies page and log in to Movebank.
- Type in the name of your study (or create a new study) and select the name from the list on the left to view the Study Details.
- Select Upload data > Import data from the Studies menu.
From here, you can import custom tabular data files using the following options:
Tracking data: For files that primarily include location data. These can contain other measurements recorded on the same schedule as the location data.
- GPS data > Custom GPS data
- Argos Doppler data > processed Argos data (csv format)
- Processed solar geolocator data > other geolocator data
- Radiotelemetry (VHF) data
- Other location data
Accessory data: For files that contain data from other sensors (current options are listed here) without locations. These typically include sensors recorded on a different schedule than location data, or as part of sensor deployments that do not result in location data.
- Light-level data
- Heart rate data > Custom heart rate data
- Other accessory data collected by your tags
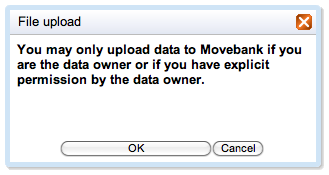
After selecting one of the options above, select Browse, navigate to the file, and select Upload. You will be asked to confirm that you have permission to upload the file:
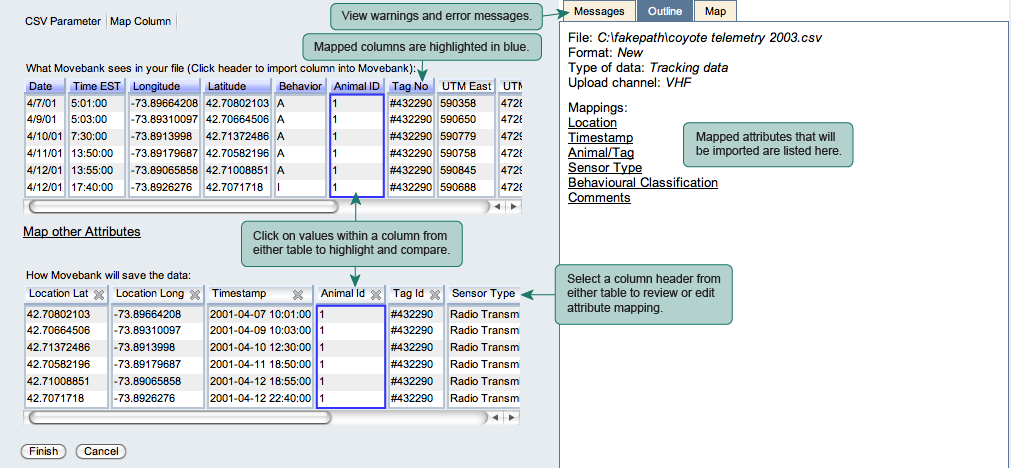
After the file has uploaded, the import interface (shown below) will open, displaying two tables that preview the first few rows of your file as Movebank sees it (What Movebank sees in your file) and as it will be imported to the Movebank database (How Movebank will save the data):
What Movebank sees in your file: You should see a preview of your file contents. Values should be separated into columns, and if your file contains headers, they should be displayed on the top of the table columns. If the contents of your file are not displayed correctly, select CSV Parameter and adjust the file format parameters manually using the options provided.
How Movebank will save the data: When you begin the import process, Movebank will have typically only defined the Sensor attribute, selected based on the option you chose in the previous step. If your file contains data from multiple sensor types, see Sensor type below).
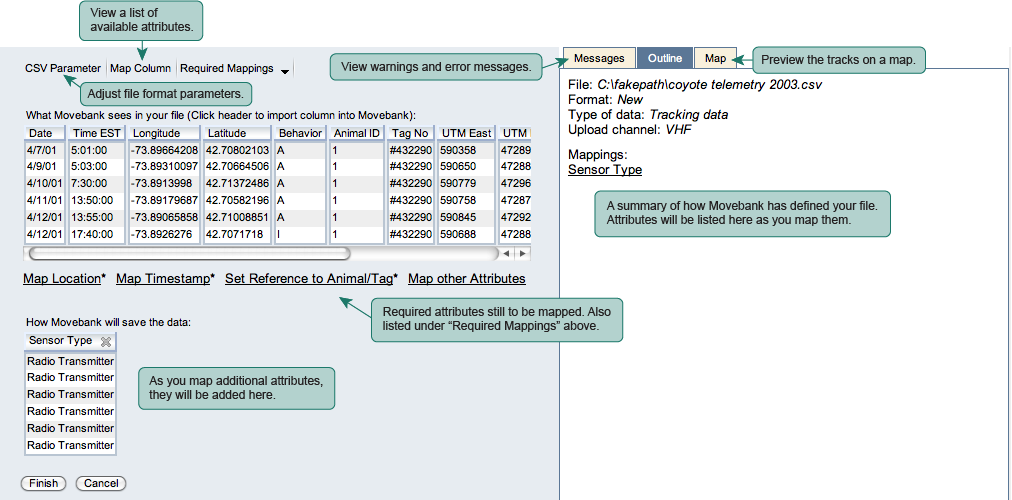
As you proceed, you will map more attributes of your data file to the Movebank format and they will be added to the lower table. Use these previews to ensure that your data are interpreted correctly. At minimum, you must map timestamp, tag IDs and sensor type. Other requirements will depend on the sensor type—for example location sensors must include location coordinates and light-level sensors require light levels.
If at any point you need to edit or review how an attribute is mapped, select the column header from either table to re-open the import options.
Sensor type
Use the Movebank Sensor Type attribute to define the type of sensor used (e.g. GPS or acceleration). This attribute may be defined automatically based on the file upload option you chose when starting the import.
-
If you want to change it, select a different sensor type from the dropdown list under Set value.
-
If no other value describes the sensor you want to include, choose accessory measurements.
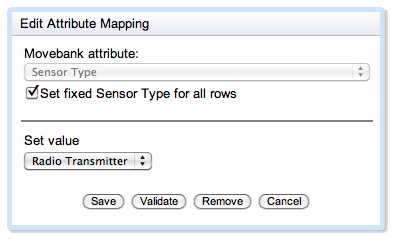
Each event record (each row in your data file) must be assigned to a single sensor type.
-
If your file includes data from multiple sensor types with one sensor reported in each row, and these types are defined by a field in your data file, you can map this information to Movebank by unselecting Set fixed Sensor Type for all rows and filling out the additional fields that appear.
-
If single records contain measurements from multiple sensor types (for example, both GPS coordinates and temperature are stored in each row of the file), we recommend choosing the location sensor type if locations are present; if not, choose what you consider to be the most important sensor present or else accessory measurements.
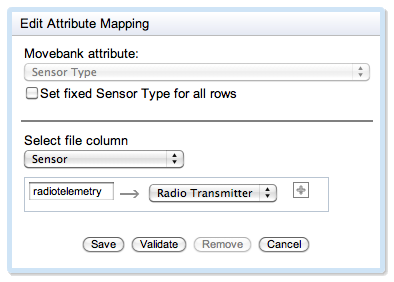
- After defining the sensor type, hit Save.
The Sensor Type column will be added to the table under How Movebank will save the data showing the sensor type. Compare these values to those in your original file to confirm the attribute was mapped correctly. If you need to edit the mapping, select the Sensor Type column header to re-open the import options.
Date and time
Date and time are mapped to a single timestamp field with format yyyy-MM-dd HH:mm:ss.SSS in UTC. You can define mapping to convert one or more date and time fields in nearly any format from your original file into this format. This same procedure applies to other attributes that contain timestamps, such as deploy on timestamp and deploy off timestamp.
- Choose Timestamp (or another date and time attribute) from the list of required mappings or under Map Column.
- Add all fields that include date and time information in your file by selecting
 and choosing the columns from the dropdown list.
 - In the Format string field/s, define the format used for your date (e.g.,
dd/MM/yyyy) and time (e.g.,HH:mm:ss) fields. Movebank will attempt to guess the format, but does not always do so correctly, so check carefully that the format is correct. For a comprehensive overview of possible patterns, see here. Here are a few examples of how the date-time 8:14 PM on July 21, 2011 might be represented in a data file, and the format string to enter to convert these values:
| Value in file | Characteristic | Format string to use |
|---|---|---|
| 2011-03-21T20:14:59Z | ISO 8610 | yyyy-MM-dd'T'HH:mm:ss'Z' |
| 21-Jul-2011 20:14:59 | 3-letter month | dd-MMM-yyyy HH:mm:ss |
| 7/21/2011 8:14 PM | times in AM/PM | MM/dd/yyyy hh:mm a |
| 21.7.2011 20:14:59.123 | milliseconds | dd.MM.yyyy HH:mm:ss.SSS |
| 202 2011 20:14 | Julian days | D yyyy HH:mm |
In addition to the data format, Movebank will need to know what time zone was used to record the data. Movebank converts all timestamps to UTC (Coordinated Universal Time, approximately equal to Greenwich Mean Time and GPS time). If your original file contains timestamps using an offset from UTC or local time zone, you need to define this here. The offset from UTC is positive for areas east of UTC and negative for areas for areas west of UTC. Local time zones can be selected from the globa-tz time zones, derived from the IANA Time Zone Database.

- When you have entered all the information correctly, hit Save.
The Timestamp column will be added to the table under How Movebank will save the data, showing the date and time in the format yyyy-MM-dd HH:mm:ss. Compare these timestamps to your original file to confirm the attribute was mapped correctly.
Check the timestamp mapping carefully, as mistakes can be nearly impossible to notice later. For example,
- If days at the top of the file are 12 or less, Movebank cannot tell months from days and might map them incorrectly.
- If you do not have a separator between hours and minutes (HHmm instead of HH:mm), Movebank cannot know whether the value "923" means "09:23" or "92:30", and thus values under 1000 might be imported incorrectly.
To edit the mapping, select the Timestamp column header to re-open the import options.
Tags and animals
Tag and animal identifiers can be added by importing event data as described here, or by adding reference data through the Deployment Manager or import of a separate reference data file. The latter option can be especially helpful if you have many data files or complicated deployments. If you map both tag and animal IDs to the event data file, Movebank will attempt to create deployments based on the tag-animal-timestamp combinations in your file. To provide the animal and deployment information in a separate step, map only the tag ID in this step.
- Choose Set Reference to Animal/Tag from the required mappings or go to Map Column and choose Animal/Tag. All records in your file can be assigned to a single tag, or you can use one or more columns in the file to define animal and/or tag identifiers. Each of these cases is handled slightly differently during import.
If your file contains a column listing tag IDs,
- Select the column that contains tag IDs. You can optionally select a column with unique animal IDs to have Movebank automatically define deployments of tags on animals based on your file. If IDs are defined based on multiple columns, you can concatenate columns using the icon.
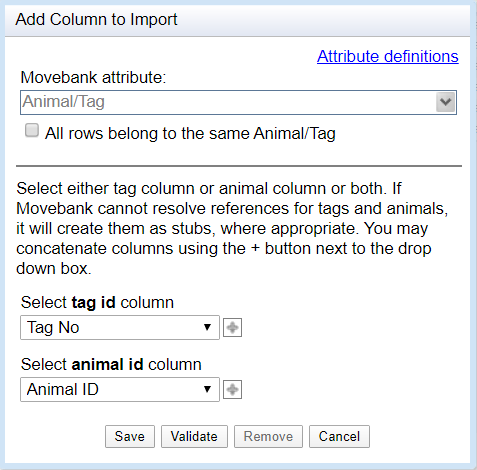
- After you have entered your information, click Save.
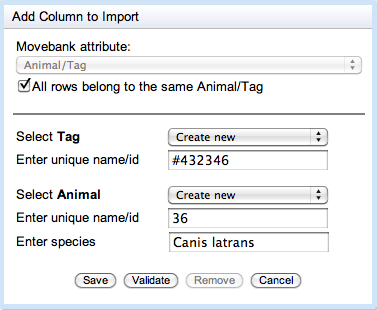
If your file contains data for a single tag, and the Tag ID is not listed in a column of the file,
- Check the box next to All rows belong to the same Animal/Tag.
- If the animal and/or tag already exist in the study in Movebank, select them from the dropdown lists next to Select Tag and Select Animal. You must define a Tag ID, and can optionally define an Animal ID to have Movebank automatically define a deployment of the tag on the animal.
- To assign the data to a new tag, select Create new from the dropdown list next to Select Tag. You will then be asked to provide a unique name or other Tag ID.
- To assign the data to a new animal, select Create new from the dropdown list next to Select Animal. You will then be asked to provide a unique name or other Animal ID and to provide a taxon or species name (common names are not allowed; species names in Movebank are based on the Integrated Taxonomic Information System, ITIS). If the species or subspecies name you are looking for is not available in ITIS, you can add this name later in the reference data using the term animal taxon detail.
The columns Animal ID and/or Tag ID will be added to the table under How Movebank will save the data. Confirm the attributes were mapped correctly.
- Select Save.
Location
To specify the location coordinate fields and their format in your file, select Location from the list of required mappings or from Map Column.
Movebank uses the open source Java library GeoTools (geotools.org) to convert all coordinate data into latitude and longitude, in decimal degrees, using the WGS84 datum. This library supports a wide variety of coordinate reference systems (CRS). The data upload currently accepts data based on the WSG84, NAD27 or NAD83 reference data and either geodetic coordinates (latitude-longitude) or Universal Transverse Mercator (UTM) projection . If your data are in another format and you need help converting them, please contact us at support@movebank.org.
For an immediate control, check the values in the preview table of How Movebank will save the data and preview the tracks on the map (select Map on the upper right).
If your coordinates are in latitude-longitude projection,
- Make sure the correct columns are selected and and provide the exact format. See here for the definitions of characters used by GeoTools for providing latitude-longitude formats.
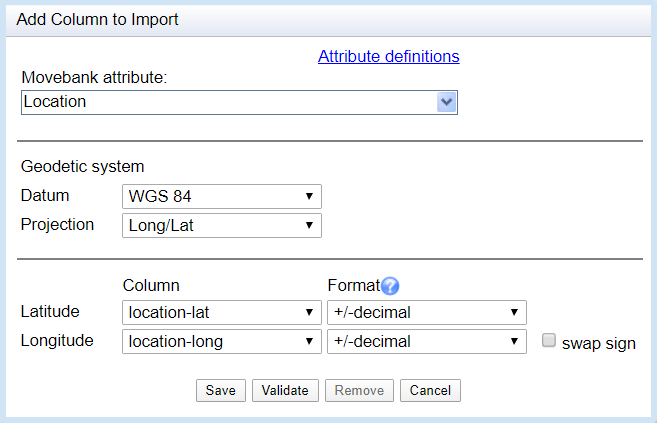
Accepted formats are decimal degrees signed +/- (e.g., -11.940), decimal degrees with N/S/W/E suffix (e.g., 10.523 N), sexagesimal degrees with N/S/W/E suffix (e.g., 11°8'9.6" S) and custom formats (e.g., 10°31.3800'). The table below shows identical latitudes and longitudes in different formats as an example.
| Coordinate | Decimal +/- | Decimal N/S/E/W suffix | Sexagesimal N/S/E/W suffix* |
|---|---|---|---|
| Latitude | 10.523 | 10.523 N | 10°31'22.8" N |
| Longitude | 33.376 | 33.376 E | 33°22'33.6" E |
| Latitude | -11.136 | 11.136 S | 11°8'9.6" S |
| Longitude | -13.162 | 13.162 W | 13°9'43.2" W |
* The character " is interpreted as a quotation mark by the parser. To use this format, the correct syntax for the deg/min/sec format is "13°9'43.2"" W" for 13°9'43.2" W.
If your coordinates are in UTM,
- Make sure the correct columns are selected and specify whether they are in meters (m) or kilometers (km). Here you also need to specify the UTM zone your data refer to.
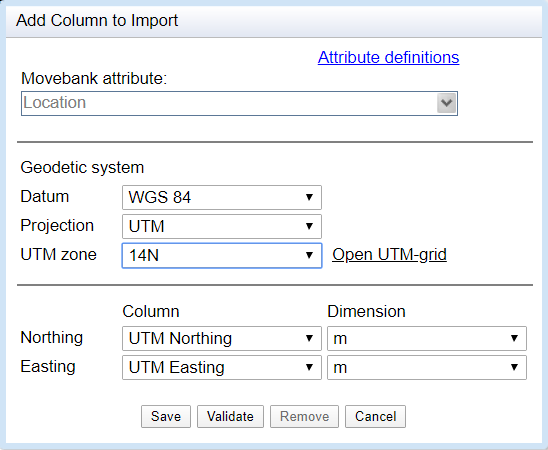
- When you have entered all the information, select Save.
The columns location lat and location long will be added to the table under How Movebank will save the data showing the latitude and longitude in decimal degrees. Compare these coordinates to your original file to confirm the attribute was mapped correctly. If you need to edit the mapping, select the location lat or location long column header to re-open the import options.
Outliers
The import marked outlier or manually marked outlier attributes can be used to identify outliers that have already been flagged in another database or by a data provider (for live feeds). You can also import other attributes containing quality information in order to run filters using these values later.
Additional attributes
See "data terms" in the Movebank Attribute Dictionary for a list of additional event-level attributes accepted by Movebank. For non-location sensors, there are often multiple ways to record and store information, so look carefully for the appropriate attributes for your dataset. This list is not static and will grow over time. Attributes specific to your dataset may be stored using generic attributes including comments, behavioural classification, habitat, migration stage, study-specific measurement and tag technical specification. If you cannot find a particular attribute in the list, select Request attribute from the upload interface and fill out the form that appears.
To import additional attributes from your file, select Map column from the upper left of the upload interface and choose an attribute from the dropdown list. You can also select a column header from under What Movebank sees in your file and choose the appropriate Movebank attribute.
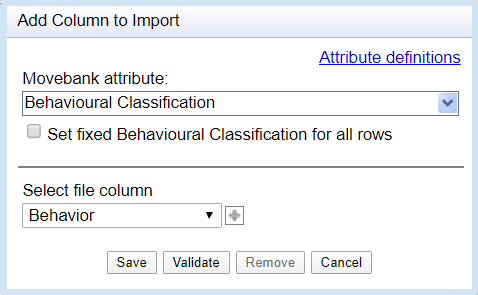
- When you have selected the correct attributes from Movebank and your file, select Save.
A new column will be added to the table under How Movebank will save the data showing the new attribute as it will be imported to Movebank. Confirm the attribute was mapped correctly.
Finishing the data import
After you have specified all the information for your data upload, review all mapped attributes once more, using the preview tables and Map and Messages tabs.
Select Finish.
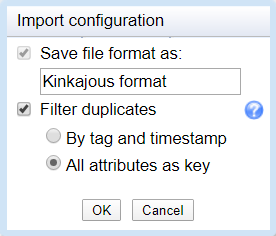
File formats: You will have the option of naming and saving your file format. Saving the format documents the mappings you used to import the file and allows you to apply the same mappings to additional files imported to the study.
Filtering duplicates: You can choose to have Movebank remove duplicates during the import:
- By tag and timestamp: If there are multiple rows with the same tag and timestamp, only the first record will be imported, and any subsequent matching records will be ignored.
- All attributes as key: If there are multiple rows in which all attribute values are the same, only the first record will be imported, and any subsequent matching records will be ignored.
- To import all rows without looking for duplicates, uncheck Filter duplicates.
Using saved file formats
If you have already uploaded custom tabular data to the same study and saved the file format, Movebank will ask if you would like to use a previously saved file format.
After selecting an upload option, choose the file to upload and select Upload. You will then be prompted to confirm that you are permitted to upload the data. The preview will appear for you to verify that all columns are mapped correctly. Make changes if needed, and proceed to Finish.
Next steps
- Add information about animals, tags and deployments in the Deployment Manager (easiest for a few tags) or by uploading a reference data file (easiest for many tags). Until data are associated with animals (depending on how tags and animals were mapped), Movebank will not recognize them as part of animal tracks and they are not visible by default from the Tracking Data Map.
- See resources for adding data for help with quality control, troubleshooting, and more.
Create and manage live data feeds
Live feeds from Africa Wildlife Tracking
Import custom tabular data